Making Chords on Guitar Tab Creator
Welcome to chord creation in Guitar Tab Creator! There are multiple ways to create chords in your guitar tablature, each designed for different workflows and skill levels.
This guide will walk you through all the available methods, from our modern Chords and Intervals tool to the classic toolbar approach and the powerful Advanced Editor.
Three Ways to Create Chords
Chords and Intervals Tool (Recommended) - Our modern, visual approach with a searchable chord library, real-time diagram preview, and the ability to save custom voicings. This is the easiest and most powerful method.
Standard Editor Toolbar - The classic fretboard-based approach using the "Create Chords" toolbar buttons. Great for quick chord entry using the visual fretboard, open up the chord tool, see the chord diagram, save it to your collection.
Advanced Editor - Keyboard-driven chord creation for logged-in users. The fastest method for experienced users who prefer keyboard shortcuts over clicking. Allows for full freedom when building your tabs.
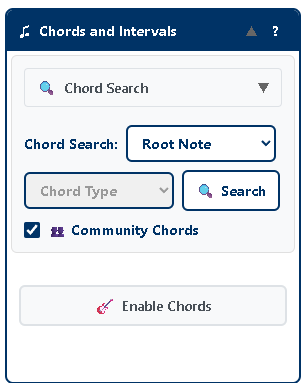
Method 1: Chords and Intervals Tool (Recommended)
Why Use This Method?
The Chords and Intervals tool is our most modern and powerful chord creation feature. It gives you:
- Visual Gallery: Browse thousands of chord variations with thumbnail previews
- Searchable Library: Find exactly the voicing you need by root note and chord type
- Real-time Preview: See chord diagrams update as you build custom voicings
- Save & Reuse: Build your personal library of favorite chord shapes
- Community Sharing: Access chords created by other musicians
Quick Start with the Chords and Intervals Tool
Step 2: Choose your approach:
- Search the Library: Select a root note and chord type, then click "Search" to browse existing chords
- Create Custom: Click "Enable Chords" and build your own voicing on the fretboard
📚 Want the Full Details?
The Chords and Intervals tool has many powerful features including community chords, saving custom voicings, and advanced search options. For a complete guide, visit:
Method 2: Creating Chords Using the Standard Editor Toolbar
The Standard Editor provides a classic fretboard-based approach to creating chords using the "Create Chords" toolbar. This method is straightforward and works well when you know exactly which notes you want to place.
Using the Create Chords Toolbar
Step 2: Once chord mode is active, you'll see three control buttons:
- "Enable Notes" - Ends chord creation mode and returns to single-note entry

- "New Chord" - Completes the current chord and moves forward to start a new chord

- "Mute String" - Allows you to mark strings as muted (X) within your chord
Step 6: When finished with the chord:
- Click "Next Chord" to move forward and create another chord
- Click "Stop Recording" to exit chord mode
Video Tutorial: Standard Editor Toolbar Method
This video demonstrates how to create chords using the "Create Chords" toolbar. You'll see the complete process of starting chord mode, adding notes, handling mutes, and creating multiple chords in sequence:
Watch: Create Chords Using the Standard Editor Toolbar →
📚 Complete Guide Available
For more detailed instructions, tips, and advanced techniques using the Standard Editor toolbar, visit our dedicated help page:
Method 3: Creating Chords with the Advanced Editor
Account Required
To use the Advanced Editor, you must create an account and be logged in. This feature is reserved for registered users and provides keyboard-driven chord creation for maximum speed and efficiency.
Why Use the Advanced Editor?
The Advanced Editor is the fastest way to create chords once you've learned the keyboard shortcuts. Key benefits include:
- Keyboard-Only Workflow: No need to click on the fretboard - use your keyboard exclusively
- Faster Navigation: Arrow keys let you move quickly through your tablature
- Complex Patterns: Create advanced chord patterns, hammer-ons, slides, and pull-offs
- Visual Feedback: A popup window shows which keys you're pressing in real-time
- Quick Muting: Press 'X' to instantly mute strings
Using the Advanced Editor for Chords
The Advanced Editor transforms chord creation into a purely keyboard-driven experience. Instead of clicking on the fretboard, you navigate the tablature using arrow keys and enter notes directly.
Video Tutorial: Advanced Editor Method
This video demonstrates the Advanced Editor's keyboard-driven approach to creating chords. You'll see how to navigate the tablature, enter chord notes quickly, and work without ever touching the mouse:
Watch: Create Chords Using the Advanced Editor →
Pro Tip
While the Advanced Editor has a learning curve, experienced users find it significantly faster than mouse-based methods. The ability to keep your hands on the keyboard and navigate quickly makes complex tablature creation much more efficient.
Which Method Should You Use?
Choose the Chords and Intervals Tool if you want:
- Access to a library of pre-built chord voicings
- Visual previews and real-time feedback
- The ability to save and organize your custom chords
- To discover new chord variations from the community
- The most modern and feature-rich experience
Choose the Standard Editor Toolbar if you want:
- A straightforward, click-and-place approach
- Visual fretboard interaction
- Quick chord entry without searching
- A familiar, traditional interface
Choose the Advanced Editor if you want:
- The absolute fastest chord creation method
- Keyboard-only workflow
- Support for complex techniques (slides, hammer-ons, etc.)
- Professional-level tablature creation capabilities
- To never leave the keyboard while composing
Conclusion
Guitar Tab Creator provides multiple chord creation methods to suit different workflows and experience levels. Whether you prefer the modern visual approach of the Chords and Intervals tool, the classic simplicity of the toolbar, or the blazing speed of the Advanced Editor, you have the flexibility to work the way that suits you best.
New users: Start with the Chords and Intervals tool to explore the chord library and learn different voicings.
Intermediate users: Mix the Standard Editor toolbar for quick entry with the Chords and Intervals tool when you need to search or save.
Advanced users: Master the Advanced Editor's keyboard shortcuts for maximum efficiency, especially when creating longer or more complex tablatures.
Happy chord creation!